
Getting Kali Linux, or any other Linux distribution, up and running on your Mac can sometimes be problematic. Although things have gotten easier with some new tools. As a Macbook Pro user (mid 2014 model) I wanted to be able to use Kali Linux on my Macbook in a USB liveboot mode, with persistence. One primary reason for wanting to maintain persistence is that there is quite a bit of setup involved to get all the drivers working, and I didn’t want to have to go through all of that each time I booted into Linux.
I tried many methods of getting things working, even following the instructions on the Kali Linux website didn’t work exactly. I ended up with a strange occurrence when rebooting that I had to select the windows partition for boot rather than the mac EFI. Below are my instructions on how I set up this live USB with persistence, it’s produced reliable results and hopefully it will do for you to. The process was done using my Macbook Pro mid 2014 model, running OSX El Capitan.
There’s a few things you will need in order to get started.
- A USB stick with minimum of 8GB storage (I’m using a 16GB scan disk USB3.0 thumb drive)
- Download the free software “Mac Linux USB Loader” from here https://sevenbits.github.io/Mac-Linux-USB-Loader/
- Download the latest build of Kali Linux (I use the amd64 version) and keep the .iso file in your downloads folder
STEP 1
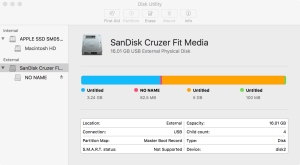
- First we need to prepare the USB stick. We will use the MAC OSX native disk utility tool for this. Open the Disk utility tool, and select the correct USB device (in my case SanDisk Cruzer…..)
- Click on “Erase” and choose the following options
- Name – Kali Linux
- Format – MS-DOS (FAT)
- Scheme – Master Boot Record
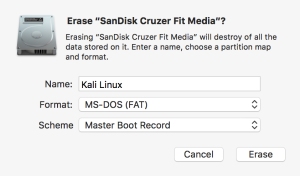
- Press the “Erase” button. The Disk Utility will then run through it’s formatting process. When finished click on “Done“. You should now have a single clean partition on your USB drive as shown below.

Now the USB disk has been prepared we can move onto the next step, which will be to setup the drive using the “Mac Linux USB Loader“.
STEP 2
- Open up the Mac Linux USB Loader software and select “Create Live USB“. This will bring up a finder window, where you can navigate to your downloaded Kali Linux.iso disk image. Select the Kali Linux disk image that you downloaded earlier.

- On the next screen you will see your USB thumb drive listed with he name “kali Linux” (if you named it that when formatting). Select this USB drive and click “Next”

- On this screen click on “Begin Installation“.
- Once this has completed, you should now find a directory structure on the USB disk like this :-/efi/boot inside the boot folder there will be a couple of .efi files and a “boot.iso” disk image.

STEP 3
- There’s one final step we need to take in order to ensure that Kali Linux boots in persistence mode every time. We need to edit the enterprise configuration file. Open up the Mac Linux USB Loader again, and select the option “Setup USB Device“.

- In the new window, select the Kali Linux USB drive from the left side. This is a list of the various available bootable USB drives. Once the correct drive is selected click on “Edit Enterprise Configuration File“. This will open a text edit window with the configuration file. You need to change the “hostname” from “kali” to “kali persistence“. Save this file, and close.


- Your USB bootable disk is now ready. Reboot your Macbook Pro while holding down the “alt / option” key. You will be presented with a boot option list, select the “EFID” boot option. This will present another menu where you can select the boot mode, and the available Linux Distributions. Kali Linux should then boot up and now you have a Linux Live session running on your machine. There’s now just one more thing we need to do in order to setup persistence and make it work correctly.
STEP 4
- We will use Linux tools to resize the partition. You can use the GUI tool “GParted” or it can be done through the terminal. Here’s the terminal commands :-
- end=7gb
- read start _ < <(du -bcm kali-linux-1.0.8.amd64.iso | tail -1); echo $start
- parted /dev/sdb mkpart primary $start $end
- after the parted process has finished there will be a new partition created at /dev/sdb3. You can verify this with the “disk -l” command to list all available drives.
- Next we wil create a ext3 filesystem in the new partition. the filesystem will be labeled “persistence”. The terminal commands are as follows :-
- mkfs.ext3 -L persistence /dev/sdb3
- e2label /dev/sdb3 persistence
- Next we will create a mount point for the new partition and then create the persistence configuration file, finally we will then unmount the partition. Here’s the terminal commands :-
- mkdir -p /mnt/my_usb
- mount /dev/sdb3 /mnt/my_usb
- echo “/ union” > /mnt/my_usb/persistence.conf
- umount /dev/sdb3
- We are pretty much done! All that remains now is to reboot (using the option key again to boot into Linux). Once into Kali Linux create a new folder on the desktop, or a file in the documents folder. Reboot again, and check that it’s still there. If so then congratulations you’ve done everything right and you now have a live bootable USB drive running Kali Linux in persistence mode on your Macbook Pro.
Now all that remains is to get the Wireless adapter working. This is by far the most difficult part of the whole process, the broadcom drivers for Linux aren’t well supported, and depending on the model year of your Macbook Pro will depend on what chipset version and driver you need.
References :-
http://www.makeuseof.com/tag/how-to-boot-a-linux-live-usb-stick-on-your-mac/
http://docs.kali.org/downloading/kali-linux-live-usb-install
http://docs.kali.org/downloading/kali-linux-live-usb-persistence

These instructions do not work
parted /dev/sda mkpart primary $start $end
Gives an error message
Error: Can’t have overlapping partitions.
LikeLike
I am running this on a MacBook Pro 15inch mid 2010 (8GB memory, 500GB storage) running El Capitan.
I have followed your instructions on your Youtube video and checked this site to confirm. I downloaded your version of the edited efi file and added my downloaded 64bit iso file and named it boot.iso … however when i attempt to boot from the live usb everything works fine until it gets to a page saying ;
———————–
kali GNU/Linux Rolling kali tty1
kali login: root (automatic login)
Linux kali 4.3.0-kali1-amd64 #1 SMP Debian 4.3.3-5kali4 (2016-01-13) x86_64
The programs include with the Kali GNU/Linux system are free software;
the exact distribution terms for each program are described in the
individual files in /usr/share/doc/*/copyright.
kali GNU/Linux comes with ABSOLUTELY NO WARRANTY, to the extent
permitted by explicable law.
————————–
it stays on this screen no matter what i do…. have i done something wrong? how can i fix this?…. i would greatly appreciate your help
thanks sam
LikeLike
/live/persistence/sda failed no such device happens and nothing else, it appears to be in a hung state
LikeLike
When creating an bootable USB stick like you say here, the whole space is being taken up by the image leaving not free partitionable space left behind, rendering the step 4 not applicable.
LikeLike
I’m getting an error in the step 4, It says ‘kali-linux-1.0.8.amd64.iso is not a file or a directory’
LikeLike
Same thing. Should this step be done on the usb-stick’s distro that we just made or an external linux distro?
LikeLike
Can the partition part be done in OS X?
LikeLike
I can’t get past the read start command. Says no such file or directory
LikeLike
I am getting an error while booting up.
mount: mounting /dev/sdb on /live/persistence/sdb failed: No such device
and then a line later:
/init: line 230: can’t open /tmp/custom_mounts.list: no such file
Any suggestions? Perhaps I need to create a file called custom_mounts.list ?
LikeLike
FYI, the Mac USB loader is no longer free.
LikeLike
free link here: https://sourceforge.net/projects/mlul/files/latest/download
LikeLike
I’m at step 4 under the second command. The response i get is “du: cannot access ‘kali-linux-1.0.8.amd64.iso’ : No such file or directory 0” Any help here would be great I’m not sure how to create that directory and I need to enable persistence on my usb so that I can complete my network security labs. Please any feedback is greatly appreciated.
LikeLike
Find out what your kali-linux iso is saved under. mine is kali-linux-2016.2-amd64.iso.
LikeLike
Work perfect!!!! thank you.
LikeLike
thanks!
LikeLike
You said that Gparted GUI was a option you should explain how to do the GUI version to. Thanks
LikeLike
I did all steps but didnt work for me mba 2015 el captian plz help
LikeLike
I used my macs internal drive made 10 gb (2) partitions ms dos osx default partitionig table for kali and persistence copied boot iso and efis using mac linux usb loader, and rebooted into live parted persistence into ext3 and created mount point and made persistence conf i restated,saved a file and restarted again and the file was no more there.I have mba 2015 11″ el captian plz help
LikeLike
works good if I don’t encrypt the disk..
when I encrypt it using Luks, it failed to detect the persistence..
any solution?
LikeLike
If anyone is having trouble partitioning the disk through terminal, just watch his video on youtube instead and he shows you how to do it in GParted. You then just pick up at “mkdir -p blahblahblah.” Hope this helped anyone who was stuck. 🙂
LikeLike
Hi, I need to grant access every 2 sec…
LikeLike
This works perfectly for me but I’m having trouble in create and switching to new users.. Once I create new user I can’t log off or switch user from root.
Any help would be appreciated.
LikeLike
You mentioned “You can use the GUI tool “GParted” or it can be done through the terminal.” Can you tell me how I do all of this in the GParted application? Terminal seems to not recognise bash etc
LikeLike
I’m not seeing a boot.iso file. I’m not sure why that is though!
LikeLike
-sdb is not an option for du. parted is not a command on mac. even with gnu tools. not sure how you did this give that…
LikeLike
I like it this
LikeLike